 |
| Friendly dragons |
In Early November I was asked if I was available for commission on a special Christmas present. I had to put off thinking about it until December, thanks to life being the chaotic nature of that time of year. Once I was able to give it some attention, I was enthusiastic to get started.
The request was for a plushie of their pet bearded dragon.
I knew I was limited on time and energy to work on this, so I didn’t want to write a pattern from scratch. I trawled the usual haunts – Ravelry, Etsy, blogs and finally Pinterest, but the first pattern I found was certainly the best.
Available on PlanetJune, this Bearded Dragon pattern was just right for this “pet project”.
Next, I needed to find the right yarn. I knew it would be tricky to both colour match and imitate scales. Being in Australia often means we’re limited by yarn available to check out in person. I want to one of my favourite brands, Scheepjes, as I knew they had some heathered type yarns.
Checking against the reference photos, I was very happy with the three colours I landed on. I put the order through and awaited (im)patiently for the parcel to arrive.
(6 minute read)
 |
| Stonewashed yarn by Scheepjes |
I ended up choosing their Stone Washed yarn as they had some
lovely yellow and brown colours in many options. The three colours were:
 |
| Scheepjes spoiling me with easy start tag |
I already had some florist wire and safety button eyes, so I was ready to start.
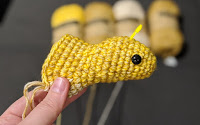
I decided to work with 2 strands at a time. This gave the effect of scales without doing regular colours changes. I made sure to send through a photo of the head to show how the colours looked together, and received a very positive response.
I struggled with the pattern a bit because I’m not used to working without slip stitch to finish each round. I understand why people avoid it – as the seam can be messy and sometimes the counts you want to work with don’t work once you have a set ‘end’ to each row. I just struggled keeping track of where I was in each row.
 |
| Scaly head starting to take shape |
Once I got past the head and started the body, I was more comfortable and not losing place as often. I had decided I wanted the belly to be lighter than the top, which meant regular colour changes. The benefit of already using two strands, was that continuing to carry another strand was a solution. I simply changed 1 strand for the new colour and crocheted over the top of the other colour.

In this case I swapped the darker colour for the lighter colour, but kept the middle colour as the base. This reduced how visible the change was once I had completed a few rows. It meant I was having to be careful about twisting the colours the wrong way and creating a mess with the yarn but I made it through.

I think I ended up missing some of the middle rows so the body wasn’t as long as the pattern called for, but I think it worked out well for the squat fat body.
I used standard polyfil which I use for all plushies, but consciously used less than normal so the body kept the oval shape instead of turning into a ball.
The tail was a work of patience, as the rows got shorter and shorter, keeping the stuffing out of the way but continuing for enough rows that the tail is nice and long. Ooph.
Once the body and tail we all finished, I then inserted a few strands of florist wire twisted together from the head through to the tail so the tail is very poseable and the body will hold the wire in place.
 |
| Starting to come together a treat |
Next was the legs and feet. These were fiddly but the pattern was a great resource for the shapes needed. The spines were interesting and taught me some cool varieties to crochet chains.
At long last, it was ready for sewing together. This was a mission for me as I fell sick at this point, working full time through a Summer head cold, the last thing I wanted to do was sewing stubborn yarn pieces together.
 |
| Next is the sewing |
Mistakes were made to make all the pieces before joining
I used the pliers frequently to pull the needle through as it would keep catching due to the tight stitches. I was so tempted to call it finished once the legs were done, it looked so good as a lizard, but those spines were absolutely the finishing touch.
 |
| Getting close to being finished |
After a few short sessions of sewing, I had the pieces all attached, even the tiny eyelids.
We arranged a pickup, the new owner seeing if for the first time in person since I made the head. She was very tempted to get progress shots but decided to hold out for the finished product.
Along the way to meeting up to give it to her, I found the perfect tree for some photos. So enjoy some proud parent photos of the bearded dragon exploring a tree at the park.
 |
| Creeping up the tree, ever so delicately |
 |
| A matching pair |

Comments
Post a Comment